Saturday, April 30, 2011

My Garden of Love

This is definitely in the top 10 favorite cards I've made. Lily Pad Cards is hosting their first ever digital die cut challenge. The very generously provided free cut files on their Web site. The challenge is to make a card using at least one of the images. If you have a die cutting machine like a Silhouette, Cricut or Pazzles, go to Lily Pad Cards and get your free files!! I've posted a pic of them below.

This week's die cut freebies are cute garden-themed images. Coincidentally, I just bought the new "Bless My Bloomers" Stamp set at Clear Dollar Stamps. Then Beate John's did a tutorial of a side step card on Splitcoast Stampers. Everything all came together. I got to use the free files, my new stamps, color with my new Copics and try a new technique. It's like Christmas, but with lots of rain instead of snow. (We just set the record for the most rainfall in April in Ohio. I'm totally ready for some sunshine!)

Here is my card:


Die Cuts from Lily Pad Cards

Monday, April 25, 2011

You're Better Than Flies!!

The recently launched blog, Lily Pad Cards, issued a challenge using Penny Black stamps. Coincidentally, I had been thinking about the Penny Black Greenline image stamp and the I Like You Better Than Flies sentiment I bought a couple years ago. I've been wanting to use them and color the image with my new Copics.  I only made one card with those stamps before, so I was eager to break them out again. Then, this challenge popped up! (No pun intended!)

In addition to using Penny Black stamps, the challenge also required you to lay out your card using the sketch below. My card was inspired by this one made by Alice Wertz, one of the Lily Pad design team members. When I saw her card, I think my jaw hit the floor. Wow!! I  was in love with her card. It's so clean and simple, yet really full of fun and whimsy! Just perfect!! I am seriously in love with that card!! Oh, yeah, did I mention how much I love her card?

Instead of using clouds like Alice, I made a speech bubble and stamped the sentiment inside. It's supposed to look like the frog on the left is saying it to the recipient, while the other frogs are busy trying to catch flies!! The image is of frogs and flies. I drew the lily pads and water by hand. I wanted to give my froggies a home.

TFL!


Sketch

Sew Lovely to Play in Challenges!

I thought I'd try my luck at a couple new challenges. I made this card for the CASE Study Challenge featuring a card made by Silke Ledlow. You can see her gorgeous creation at the bottom of this post. 

I also made the card for a recently launched challenge blog called Lily Pad Cards. I've been following them since day one. This is the first challenge I've entered. The challenge is to create a card inspired by a book cover. This particular cover (shown below) is for the book "Around the World with Auntie Mame." I've never read it, but looks interesting!! Auntie Mame wears very fashion-forward clothes, so I thought a fashion theme was quite appropriate. 

I am sorry it's so shadowy. It has been raining for days here in Ohio. The sun finally came out briefly early this evening just before the sunset. This was the best I could get before the Lily Pad challenge ended. :-(

I got to use my Copics again to color the dress, except for the belt and trim. I used my silver leafing pen for that. Auntie Mame seems like she likes a lot of bling, so I had to add the sparkly gems, of course.


Cover for the Lily Pad Cover Lover Challenge
Inspiration Card for the CASE Study Challenge

First Card with My New Copics!!

I made this card last week, but I've been waiting for the sun to come out to take pictures outside. It finally came out for a brief time today before it got dark. We have had so much rain and gray skies lately. This card is sure to brighten someone's day.

I finally took the leap and invested in some Copic Sketch markers. Wow! They are awesome. Now I see why people are raving about them. I am hooked!! I played around with blending after watching some tutorials online. This is my first creation. I hope to take some classes soon so I can hone my skills.

Thanks for looking!


Friday, April 15, 2011

Think Fast!

This is my first-ever submission for the Etsy-Inspired Challenge. How does it work? Each week, an Etsy store is featured. Participants go to the Etsy store, find and item or two that inspired them and create a card from the inspiration piece. I encourage you to go over there an play! This week's store is Think Fast Designs. Two of their products inspired me. One was a cute ruffled apron. The other were boutonnieres made from buttons.

Here is my card and the inspiration pieces:


I took strips of paper and created a scalloped edge with my Stampin' Up slot punch. I distressed the edges to make the paper look more like fabric and adhered them in layers. I created the embellishment with buttons and baker's twine. I basically tied the buttons together with baker's twine and left extra for the stems. I then took all the twine, twisted it and used some tape to adhere the ends. I stamped the sentiment onto the tag, and then used dimensional stickers to pop it up. It was very fun. I hope you like it! :-)

Sunday, April 10, 2011

Another Awesome Moxie Fab Challenge

In My Beautiful Balloon!!!

I'm loving the Moxie Fab Challenges. They have been so much fun. If you're a paper crafter looking for a fun incentive to make a beautiful card, then head on over to the Moxie Fab World Blog and enter the In My Beautiful Balloon Challenge.

Hot air balloons are really ... well, hot right now. There are tons of stamps and digi images available. Or, if you're like me and you don't have a hot air balloon image, you can go over to the Paper Crafts Magazine blog, click on the download link and get a pdf with a pattern to make your own hot air balloon by piecing paper together. I actually took it a step further. I imported the image into my Silhouette Studio cutting software, converted it into a cut file and let my Silhouette do all the work. Die cutting machines will give you a perfect cut almost every time. :-)

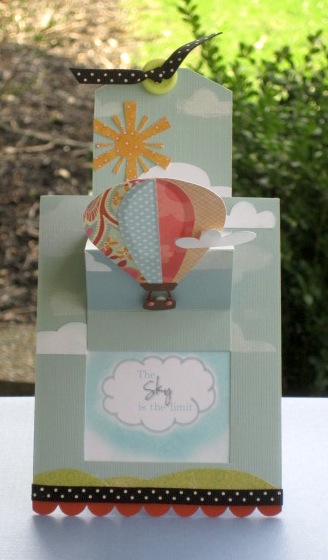
I created the sentiment on my computer and then masked it off and inked the edges to give it a more cloud-like effect. I found patterned paper that complemented eachother for my balloon. Many companies make packs of paper designed to be mixed and matched together. I didn't do that this time, but if you're looking for an easy way to mix and match patterned paper, you can certainly take advantage of the packets that come as a set.

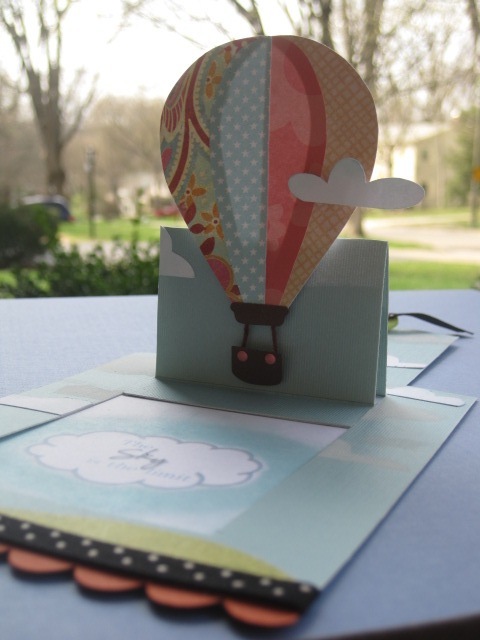
The challenge calls paper crafters to use hot air balloons in an innovative way, so I decided to create a surprise pop up card. I wanted the hot air balloon to look like it was floating up off the card. For the pop up card, I found a tutorial on Splitcoast Stampers (thanks Beate!) that gives very easy-to-follow instructions.
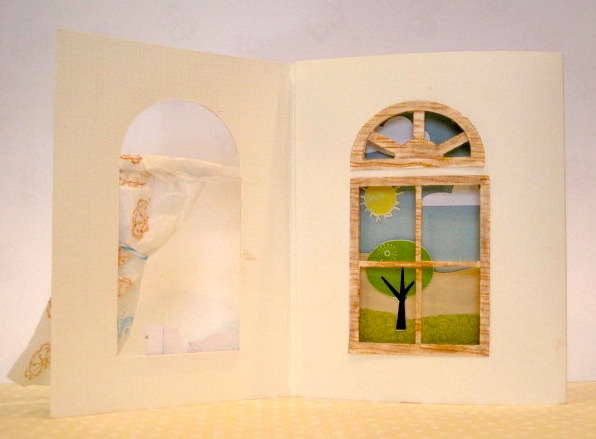
Front of card

Artsy view of card

Balloon detail

Sentiment detail

The whole enchilada with tag pulled, balloon lifted up and sentiment exposed!!

Love to you

Isn't this sweet?!? This week's SCS inspiration challenge featured Cox and Cox. This pinboard served as my inspiration. When I saw the little note on the pinboard with the cute little stick figures, I immediately thought of my Stampin' Up! All In The Family stamp set. I love this set. The sentiment is from Stampendous. I recently purchased the striped grossgrain ribbon and have been waiting for an opportunity to use it. It's so fun to break out your new goodies and start playing with them!


Monday, April 4, 2011

Welcome Tess!

I made this for my new niece, who was born last week. I couldn't post the card right away because I didn't want my SIL to see it before she received it!! The card was inspired by this one made by Kristina Werner.


Don't Be Crabby!

I made this for the Splitcoast Stampers Inspiration Challenge: To make a card inspired by something from the Outer Banks Trading Group. I chose a cute sign as my inspiration.


The sentiment was computer generated
The crab is a color digi stamp from Zenware Designs
I scored the paper to look like bead board with my Martha Stewart Scoring Board
I distressed it with a colored pencil to give it that beach worn look

Here is the actual sign:


Clean & Simple Stamping

Another New Challenge!!

Today I made a card for the Clean & Simple Stamping challenge blog. This is my first entry in the Clean & Simple challenge. I really enjoy participating in card-making challenges for so many reasons. First, they really are challenges. They motivate me to take my card-making skills to the next level. They inspire me to be more creative. Second, I really enjoy looking at other people's creations and seeing their interpretation. It amazes me that we all make cards for the same challenge, but no two cards are alike. I really love the individuality and creativity of all the participants. Third, challenges give me an opportunity to talk about my favorite hobby with others who have the same passion. And last, it gives me a reason to make a card (as if I need a reason!)

Here is the card I made for the FTL134 challenge:


To make this card, I used:
  • Computer for the sentiment
  • Papertrey Ink Spot Dots
  • Baker's twine

The challenge is to make a card using this sketch:

FTL134

Friday, April 1, 2011

Another Moxie Fab Challenge!

Every Tuesday, the Moxie Fab World blog has a card challenge called Trigger Target. This week's mission was to make a card inspired by a beautiful photo of a hand painted towel with some doily patterns and mason jars (shown below). As I was looking at the photo and thinking about a card that would capture the feel of the Trigger Target, many wonderful cozy thoughts came to mind. I wanted to incorporate the towel, but I also saw a window frame in the background, which made me think of a window card. Then, I read the theme of the challenge - Farm Fresh. Wow! I grew up in a rural town and my grandparents lived on a farm, so you can imagine all the wonderful memories that came flooding into my head. But, how could I create a window card with an image similar to the towel and also capture the Farm Fresh theme? I know! I know! How about a fresh baked apple pie and some mason jars in the window!!

Trigger Target: Farm Fresh


I used my Silhouette machine to create the window card. I created the cut files myself. It was pretty simple. I just needed squares and circles. The hardest part was aligning the cuts so that when I folded the card, the windows would be in alignment. The trees, sun and clouds were also cut with my Silhouette machine. I cut the sky, grass and farm field by hand. I used my Unity wood background stamp for the wood window frames and masked off the areas I didn't want to look like wood.

The front of the card is my favorite part. You're going to laugh when I tell you what I used for the curtain ... It's one of those cloth wipes for your eyeglasses. You know, the kind you get from your optometrist! I stamped the images onto the cloth and they turned out really crisp and clean! In my first attempt, I used gauze, but the images were just too blurry. Then I found some fabric interfacing. It was better. Then, I came across the eyeglasses cloths and noticed they were already the perfect size and shape. I stamped the images and they looked pretty good! Finally, I drew the cracks on the "walls" and distressed it. The card looked too plain and boring. The cracks give it more visual appeal without taking away from the real focal point. It also gives the walls a more authentic farmhouse look.

Thanks for looking!


LinkWithin

Related Posts Plugin for WordPress, Blogger...